INSTALLATION CENTER

Let’s get your Unclog installed.

Choose your setup below. We’ll show you the right video, the key steps, and exactly what to know before you start.

Choose your install method

START HERE

How are you installing Unclog?

Not sure? The quick install is the best choice for most homeowners.

QUICK INSTALL

Installed in under 10 minutes.

The fast, homeowner-friendly setup uses the included corrugated flex hose and free-flow drain mechanism with minimal tools.

TOOLS REQUIREDJust the basics
Tape
Flat-head screwdriver
Drill + 1/4-in & Phillips bits
INCLUDED WITH UNCLOG

What comes in the box.

  • Unclog unit + mounting hardware
  • Corrugated hose + two clamps
  • Free-flow drain mechanism
  • Installation template
THE TWO CONNECTIONS TO KNOW

Use the pictures as your checkpoint.

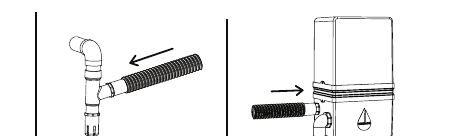
Choose the correct free-flow fitting size, then clamp the hose between the drain mechanism and the port labeled IN.
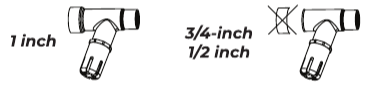
Free-flow drain mechanism sizing diagram
Choose your drain size
Hose connection diagram
Connect and clamp both ends
THE OVERVIEW

Six simple steps

Watch the video for full detail before you begin.

  1. 01
    Mark & mount

    Use the included template. Install Unclog within 5 ft of the drain line and below the primary drain pan.

  2. 02
    Size the connection

    Use the mechanism as-is for 1 in, trim to 3/4 in, or keep a coupler/elbow for 1/2 in.

  3. 03
    Orient the drain

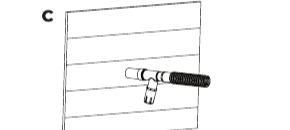
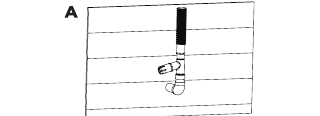
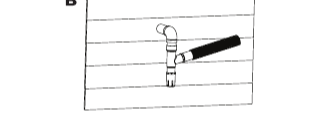
    Position the hose and ball mechanism for an upward, downward, or sideways drain as shown in the guide.

  4. 04
    Connect the hose

    Run the hose from the free-flow mechanism to the port labeled IN, then tighten both clamps.

  5. 05
    Add power

    Hand-tighten the power cord into Unclog, then plug it into a 110V outlet.

  6. 06
    Choose a schedule

    Connect with the Smart Life app or use the offline button to select a preset schedule.

DRAIN DIRECTION MATTERS

Position it for proper flow.

The hose and ball mechanism change sides depending on whether your drain runs upward, downward, or sideways.

Open the complete guide ↗
AFTER INSTALLATION

Now choose how it runs.

Use the Smart Life app for full control, or set a schedule directly on the unit—no Wi-Fi required.

RECOMMENDED

Set up with the Smart Life app

  1. Download SmartLife- Smart Living and create an account.
  2. Unclog should appear automatically. If not, press the ONLINE button.
  3. Connect it to Wi-Fi and choose your cleaning schedule.

○ Blinking white = pairing   ·   ● Solid white = connected

NO WI-FI NEEDED

Use offline mode

Double-press the OFFLINE button to move through the presets. The blue LED blinks to confirm the selected schedule.

HOLD 3 SECRun a manual cleaning cycle anytime.
TRY THE BUTTONTap to preview the next preset
BLUE LED1 blink

Every 3 days

BLUE LED QUICK GUIDE

Count the blinks. Know the schedule.

Every 3 daysHigh-use / humid season

●●WeeklyRegular prevention

●●●MonthlyLight maintenance

●●●●Every 3 monthsSeasonal check-in

●●●●●Every 6 monthsOccasional use

!
One important placement rule

Install Unclog below the primary drain pan of the air handler and within 5 ft (1.5 m) of the drain line.